Creating clothing with a Roblox shirt template is a fun way to get creative, learn more about making 3D graphics on computers, and show other players your artistic side. Unfortunately, you can only create shirts and pants as a Builders Club member, but anyone can make a t-shirt! If you choose to create a t-shirt, be sure to make a design that will stick out among other members who don’t have the Builders Club membership.
Once you’ve looked through our Roblox shirt template and Roblox pants template guide and created your own, the design will need to be reviewed and approved by a moderator. So in the meantime, be sure to check out our Roblox Slender and Roblox faces guides, the newest available Roblox promo codes, and the best Roblox games.
How do I get started with a Roblox shirt template?
Firstly, you need to choose which item you want to create. If you’re going to make a shirt or pants, you will need a Roblox Builders Club membership. If you’re going to create a t-shirt you don’t need any membership. Once you have decided, you need to follow the instructions for the item you want below.
How do I make a Roblox t-shirt?
A t-shirt is the easiest option for a Roblox shirt template. All you need to do is create an image with ideally 128×128 pixels; this can be done with any image editing software such as Photoshop, GIMP, or MS Paint. The image you choose will be applied to the front of your avatar’s torso. Once you have created your image you need to upload it to Roblox, and the upload instructions are the same for every item of clothing. You can find help with the upload process below.
How do I make a Roblox shirt or Roblox pants?
This process is slightly more complicated, unlike t-shirts, Roblox shirt templates and pants templates wrap around your whole avatar, allowing a lot more creativity. To get started, you need to save one, or both, of the templates below then draw your art on top.
- Right-click the image you want and select save image as…
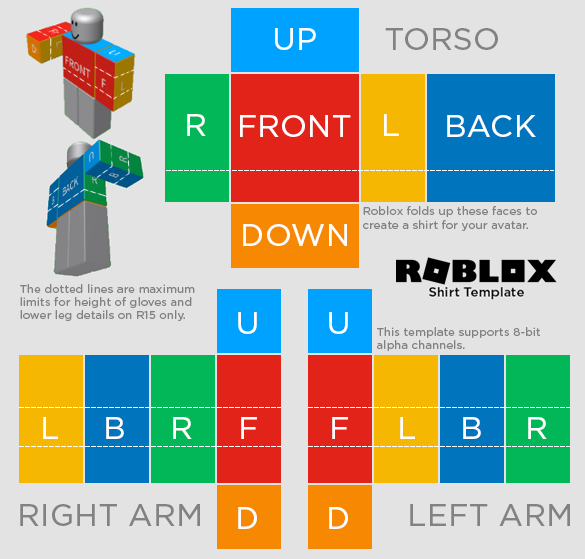
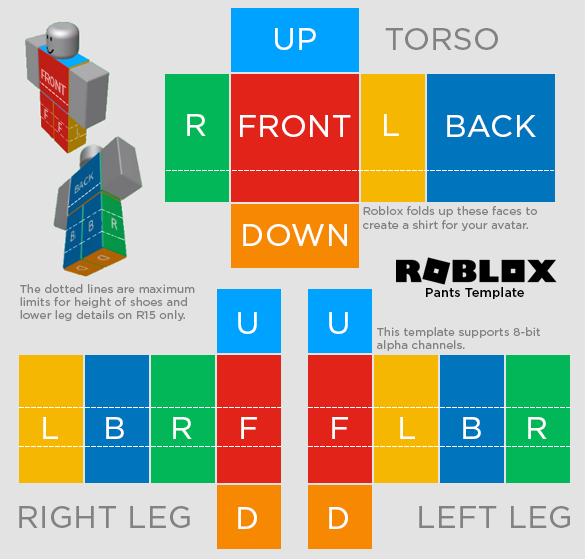
- Open the image in your chosen editing software such as Photoshop, GIMP, or MS Paint. As you can see from the template, each part of the image folds up to wrap around your avatar
- Each part needs to be a specific size;
- Large square, 128 × 128 pixels. This part goes on the front and back of your torso
- Tall rectangle, 64 × 128 pixels. The R and L parts go on the sides of your torso. The L, B, R, and F parts go on the sides of your arms or legs
- Wide rectangle, 128 × 64 pixels. This part goes on the top and bottom of your torso
- Small square, 64 × 64 pixels. This part goes on the top and bottom of your arms or legs
- Apply your design to each part, save it, and you are done!
How do I upload my design?
Congratulations on completing your Roblox shirt template! It is now time to upload them for a moderator review.
- Go to the Roblox create page
- In the left column, choose either Shirts, Pants, or T-Shirts, depending on your design
- Click Choose File to add the design you would like to upload
- Type in a fun, creative name for your design
- Click on the Upload button
Once your design is approved, it will appear in your creations and can be worn by your avatar or offered for sale to other Roblox players.
There, you have it, that’s everything you need to know about the Roblox shirt template. If you fancy a break from Roblox, be sure to check out our picks for the best mobile multiplayer games and the best mobile puzzle games here.
